

Start a design
Open Designs in the menu, under Marketing. It has three tabs:
- Templates has your team's templates. Berchtold templates and Canva templates are both there, and each is marked.
- My designs has the designs you made. A listing kit's designs are on the listing's page in Listings. See Listing kits.
- Brand kit shows your typefaces, your brand colors and your logos from Brand guidelines. It also has your font files. See The brand kit.
Select Use template to make your own copy of a template. You can change your copy as you like. The template does not change.
Select New design to start from a size. Social sizes are Instagram post, story and Facebook post. Print sizes are flyer, sign-in sheet, postcard and sign rider. There is also an email header, or you can type your own size.
A Canva template opens the Canva settings. Canva fills it from your listing in your Canva account.
You can also start from a design you already have. Select Import from Canva to bring in one of your Canva designs. See Import a Canva design. Select Import a PDF to make a design from a PDF in Media. See Make a design from a PDF.
Start from a Berchtold starter
Templates also has Berchtold's starters: designs that are ready to use. Each is marked Starter. The starters are in categories. Select a category, such as Holidays, to see only that category. Select All to see every category again.
| Category | Starters |
|---|---|
| Listings | Posts, stories and Facebook posts for coming soon, just listed, open house, price improved, under contract and just sold. Back on market and happy closing. Print: a feature sheet, an open house flyer, a sign-in sheet, two postcards and a sign rider with a QR code. Email headers and an open house email image. |
| Announcements | News to share: a product launch, an update, office news, an important date, a new product or an item back in stock. |
| Offers | A sale with its code and the date it ends. |
| Tips | Tips for buyers and sellers, a how-to guide, a common question, a product spotlight and a short tip. |
| Brand | Meet your agent, meet your advisor, meet the team, your services, an insight, a neighborhood spotlight, and "What is your home worth?" |
| Reviews | A client review with five stars, and a customer story. |
| Holidays | New Year, Independence Day, Thanksgiving and Happy holidays. |
| Events | A client appreciation event, a webinar, a workshop and a trade show. |
Most real estate starters come as an Instagram post and a story.
Starters for your type of business
Your business type decides the order. You see the starters for your type first. Then you see the starters for every business. Real estate starters show only while Real estate is on.
| Business type | Starters |
|---|---|
| Software | Product launch, What's new, Webinar, How-to guide, Customer story and Insight. |
| Professional services | Meet your advisor, Our services, Workshop, Important date, Common question and Office news. |
| Products | New product, Sale, Back in stock, Product spotlight and Trade show. |
| Every business | Announcement, Tip and Meet the team. The client review, the holidays and the client event fit every business too. |
These starters come in four sizes: an Instagram post, a story, a Facebook post and an email header. The How-to guide's post and story are a carousel. It has a cover, then one slide for each step.
The fields in your copy use your word for the person who owns a deal. A software workspace sees Rep name. A real estate workspace sees Agent name.
A customer story shows your customer's words. Type their words exactly, with their name and title. Use only words your customer agreed to share.
Select Use template on a starter to make your own copy. Your copy takes your brand colors, logo and fonts, and your name, phone, email, license number and photo. For a listing design, select Fill from a listing or contact to put in the listing's photos and details. See Your brand fonts.
The status banner shows the listing's status. When the listing goes under contract, the same design says Under contract. When its price goes down, it says Price improved.
Some words are yours to write. Change a tip, a place's name, or an event's date, time and place. In Media, replace the sample photo with your own, such as a photo of the neighborhood or the event's place.
A client review shows your client's words. Type the review word for word, as your client wrote it, and their first name. Do not change their words.
The brokerage name, the MLS credit line and the logo stay locked, so each copy keeps them. A design that shows a listing's photo or details has the MLS credit line. Workspace admins can select Copy as template to make a starter one of the workspace's templates.
Make designs on a listing shows the Listings starters only.
The three market chart starters show the median sold price, the number of active listings, or the days on market. Choose Fill from a listing or contact and pick a listing. The chart then uses your market that includes that home. The export uses that market's MLS report, with its date and credit line. A month with no data stays empty. If the report has no data, the export stops and says why. The starter previews use made-up numbers, and say so.
To see the latest charts and listing details, open Design actions → Preview with live data. Select Refresh preview to load them again. Market charts also update when you export. This device downloads the files, and Berchtold saves a copy to Media too.
Add a QR code
Select QR code in the Elements panel or in the tool bar. Then choose what the code opens:
- This listing's page: Berchtold makes the code for each listing. It opens the listing's page on your website, and counts the visit for your campaign. Until a listing fills the design, a grey code shows. Berchtold needs your website to make this code. Without a website, the export stops and says why.
- A web address: the code opens the address you type. It starts with https:// or http://.
Find your way around the editor
The editor opens full screen.
- The top bar has the design's name and whether it is saved. It also has Undo, Redo, Fill from a listing or contact, Preview and Export.
- The rail on the left opens a panel: Media, Templates, Elements, Text, Brand, Fields and Layers.
- The canvas is in the middle. Each artboard is one size of your design, such as a post and a story.
- The tool bar is at the bottom of the canvas.
- The right panel shows what you can change on the selected layer.
The editor saves your changes as you work. The top bar says Saved, Saving or Not saved.
Use the tools
Point to a tool to see its name and its key.
| Tool | Key | What it does |
|---|---|---|
| Move | V | Select, move and resize layers. |
| Select area | M | Drag a box to select layers, even when starting over a photo. Hold Shift to add to your selection. |
| Hand | H | Move around the canvas. You can also hold Space. |
| Artboard | A | Draw a new artboard. |
| Rectangle, Ellipse, Line | R, O, L | Draw a shape. |
| Text | T | Click to type new text. |
| Photo | P | Opens Media, so you can add a photo. |
| Field | F | Click a text or a photo to make it a field. |
With Move, drag from an empty part of the canvas or an artboard to select the layers your box touches. Hold Shift to add to your selection. Groups stay together. To select layers inside a group, hold Ctrl or ⌘ as you start the box. Select an artboard by its name above the canvas or in Layers.
Zoom with Ctrl or ⌘ and the mouse wheel, or pinch on a trackpad. Press Shift+1 to see all artboards.
Press ? to see every keyboard shortcut.
Change the selected layer
When you select a layer, a toolbar shows above it.
- For text, change the font, the size, the color, bold, italic and the alignment.
- For a photo, select Replace photo or Crop.
- For a shape, change its color.
To show a photo or other layers inside a shape (a mask), put the shape below them. Select the shape and the layers, then choose Use as mask. The bottom layer becomes the mask. Choose Release mask to show the full layers again. You can undo both.
Use Rounded corners in the right panel to soften the corners of a rectangular photo or shape.
Right-click a layer for more. You can replace a photo, crop it or make it a field. You can also duplicate, arrange, copy the style, lock and delete.
The Layers panel lists every layer. You can select, show, hide, lock and rename layers there, with the mouse or the keyboard.
Advanced controls
Select layers, then expand a section in Properties on the right. On a phone, open the Properties tab and select the layers from its list. The artboard background is in the list too.
| Control | What you can change |
|---|---|
| Photo adjustments | Exposure, contrast, saturation, warmth, tint, highlights and shadows. Reset returns the adjustments to zero. |
| Arrange | Flip horizontally or vertically, bring forward or send back. To space layers evenly, select at least three layers in one group. |
| Gradients | Gradient type, direction, colors, opacity and up to 16 stops. |
| Shadows | Color, horizontal and vertical position, blur and spread. |
| Borders and lines | Color, thickness, border position, dash lengths and line ends. |
| Text formatting | Letter and paragraph spacing, capitalization, bullets and numbered lists. |
| Fit text to box | Set the box height and minimum font size, then shrink the text to fit. A message says if it still cannot fit. |
| Combine shapes | Union, subtract, intersect or exclude selected shapes in the same group. Subtract cuts the upper shapes out of the bottom shape. |
| Automatic layout | Put the selected layers in a row or column, then set the space between them and around them. |
| Select matching fill | Select unlocked layers with the same solid fill color. |
| Find and replace | Find text across the design, then replace all matches. Capital letters must match. Locked layers are skipped. |
You can undo each change. Your changes stay when you save, reopen and export. To change a group with locked layers, unlock them first.
Add photos, text and your brand
- Media shows your media library, stock photos and your logos. Click a photo to add it. Drag a photo onto a frame to put it there. With a photo selected, a click replaces it.
- Text adds headings and listing headlines, such as Just listed and Open house. It also adds listing details that are fields, such as the address and the price.
- Brand has your brand colors, fonts and logos, and the fonts in this design. The logos are the ones in Brand guidelines. Workspace admins upload fonts in Designs, Brand kit. Use TTF or OTF files that you may use, such as open fonts (OFL).
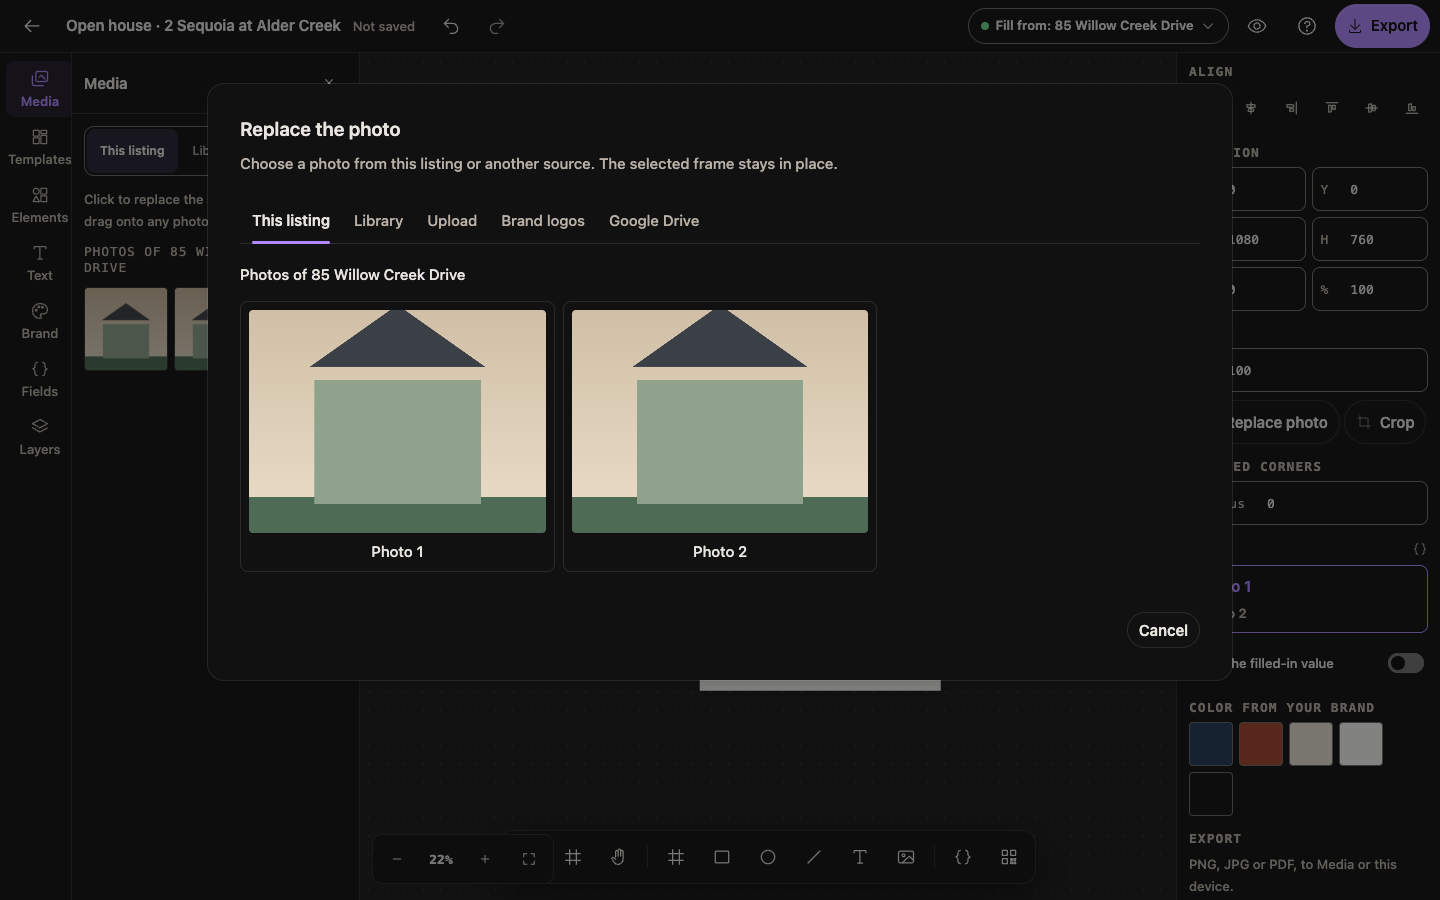
Replace photo opens This listing first. Choose one of the listing's photos, or switch to Library or another source. If you have not chosen a listing yet, choose Fill from a listing or contact. When you choose a listing photo, the frame's field changes to that photo too.
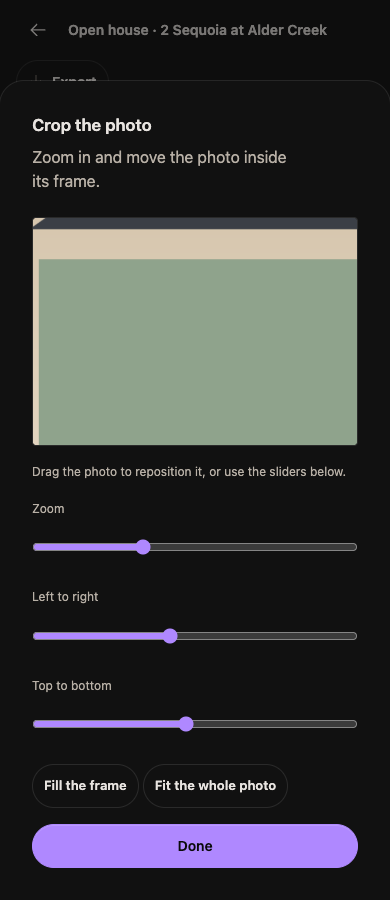
In Crop, drag the photo to move it inside its frame. For small changes, or to use the keyboard, use the zoom and position sliders. Undo takes back one drag at a time. The crop and the photo's opacity stay with the design when you save, reopen or download it.
The brand kit
Open Designs and select Brand kit. It shows what Brand guidelines says about your brand. Connected chat apps read the same Brand guidelines.
- Fonts lists the typefaces in Brand guidelines first, with their weights and what they are for. Each one says if its font files are in the kit:
- In the kit: its files are uploaded.
- Missing and the weights: upload a file for each weight it lists.
- Not in the kit: no file yet. A workspace admin selects Upload font on its row.
- Built in: every workspace has it.
- Then come the fonts every workspace has, and the font files your admins uploaded.
- Colors and Logos come from Brand guidelines. Each logo shows its name, its variant and where to use it. A logo for dark backgrounds shows on a dark tile.
To change a typeface, a color or a logo, select the link under it. It opens Brand guidelines. The brand kit, Media, email and chat apps then show the change.
Your brand fonts
A new copy of a Berchtold starter uses the typefaces in Brand guidelines:
- Headlines, prices and names take your display typeface.
- All other text takes your body typeface.
Each text keeps a weight near the starter's, such as SemiBold. Text that does not fit in your font gets a slightly smaller size. If a typeface has no font file in the brand kit, its text keeps the starter's font. The brand kit shows which files are missing.
New text from the Text panel uses your brand fonts too. Your team's templates, designs from Canva and the designs you have now keep their fonts.
Change the fonts of a design
Open Brand in the rail. Fonts in this design lists each font the design uses and how many text layers use it.
- In Replace, choose a font of the design.
- In With, choose the new font. Your brand fonts are first in the list.
- Select Replace font.
Every text layer in that font changes, at the nearest weight. Text that no longer fits gets a slightly smaller size.
Select Use brand fonts to give the whole design your brand fonts, as a new copy gets them.
Each change is one step, so Undo puts the fonts back. Layers that a template locks keep their font.
To change the font of one text only, select it. Then choose a font in the toolbar or the right panel.
Make fields and fill them from a listing
A field fills from a listing. For example, an address field shows the listing's address.
- Select a text or a photo.
- Select Make it a field.
- Choose the listing detail it shows, such as Address or Photo 1.
Select Fill from a listing or contact in the top bar and choose one of your own listings. You can also choose a contact or a deal. The design shows the listing's details and photos. You can keep changing the design while they show: move, resize and restyle anything. Berchtold saves the design with its own sample words and photos, never the listing's. The listing's details and photos come back each time the design fills from a listing.
The fields the listing fills show the listing's words and photos. To change a field's sample words or photo, turn off Show the filled-in value first. While the listing's details show, Undo does not go back past them.
Only your workspace's own listings fill designs.
Versions, comments and shared edits
Open Design actions (the three-dot button) on a phone or desktop.
- Version history lists the last ten saved versions. Restore saves your current work first. Then it makes a new version from the one you chose.
- Comments lets people who can open the design talk about it. You can reply, resolve a comment or show the layer it is about. To link a comment to a layer, select the layer before you post. The person who wrote a comment, or a workspace admin, can delete it.
- Preview with live data shows the latest listing details and market charts, from the same places as the export. If something does not load, it says so, and you can try again.
People who may edit a design can work on it at the same time. Their saved changes show when you pause. Changes to different things join together. If you both change the same thing, the editor stops saving and offers Save my changes as a copy. Save the copy before you reload, or you lose your changes. The same happens when you both add things that clash.
Animation
Choose GIF in Export to play artboards as a slideshow. Choose 2 to 20 artboards of the same size, set the seconds for each, and choose whether it repeats. They play in the design's order. A GIF is at most 1080 pixels on its longest side.
Export
Select Export. Choose the artboards, the format (PNG, JPG, PDF or GIF) and where the files go.
- Media saves the files to your media library.
- This device downloads them.
Print sizes export at 300 dpi. A PDF has the artboard's own size, ready to print. When a design shows a listing's details, Berchtold makes the files and saves them to Media.
A large export can take a while. You can close the window and open Export again later. Select Resume export to finish your download. If your connection drops, you can try again.
Before you export at the top of the Export window checks the design against your workspace's rules first. A rule marked Fix stops the export until you fix it. See The compliance check.
On a phone
On a phone or a narrow screen, the editor shows the artboard and five tabs:
- Fields: type each field's value, or choose its photo.
- Media: replace a photo.
- Text: change any text.
- Brand: color the shapes with your brand colors, and change the fonts of the design.
- Properties: select layers or the artboard background. Then change their format and arrangement.
Export works the same way. To draw and move layers, open the design on a wider screen.
Templates for your team
Workspace admins make templates. Select New template in Designs.
Lock the layers your team must keep, such as the logo and the legal lines. A design made from the template keeps them locked. Only an admin can unlock them.